
Page 352 - Demo
P. 352
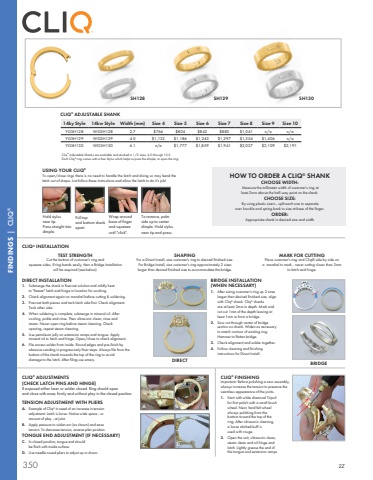
350 2ZSH128 SH129 SH130CLIQ%u00ae ADJUSTABLE SHANKUSING YOUR CLIQ%u00aeTo open/close rings there is no need to handle the latch and doing so may bend the latch out of shape. Just follow these instructions and allow the latch to do it's job!Hold stylusnear tip. Press straight into dimple.Pull top and bottom shank apart.Wrap aroundbase of fingerand squeezeuntil \To remove, palm side up to center dimple. Hold stylus near tip and press.HOW TO ORDER A CLIQ%u00ae SHANKCHOOSE WIDTH:Measure the millimeter width of customer's ring at least 2mm above the half-way point on the shank.CHOOSE SIZE: By using plastic sizers - split each one to separate over knuckle and spring back to size at base of the finger.ORDER: Appropriate shank in desired size and width.SHAPING For a Direct Install, size customer's ring to desired finished size. For Bridge Install, size customer's ring approximately 2 sizes larger than desired finished size to accommodate the bridge.DIRECT INSTALLATION1. Submerge the shank in firecoat solution and mildly heat to \2. Check alignment again on mandrel before cutting & soldering. 3. Firecoat both pieces and tack latch side first. Check alignment. Tack other side. 4. When soldering is complete, submerge in mineral oil. After cooling, pickle and rinse. Then ultrasonic clean, rinse and steam. Never open ring before steam cleaning. Check opening, repeat steam cleaning. 5. Use petroleum jelly on extension ramps and tongue. Apply mineral oil to latch and hinge. Open/close to check alignment. 6. File excess solder from inside. Round edges and pre-finish by abrasive sanding in progressively finer steps. Always file from the bottom of the shank towards the top of the ring to avoid damage to the latch. After filing use emery.BRIDGE INSTALLATION (WHEN NECESSARY)1. After sizing customer's ring up 2 sizes larger than desired finished size, align with Cliq%u00ae shank. Cliq%u00ae shanks are at least 2mm in depth. Mark and cut out 1mm of the depth leaving at least 1mm to form a bridge. 2. Saw cut through center of bridge section on shank. Widen as necessary to match contour of existing ring. Hammer to flatten bridge. 3. Check alignment and solder together. 4. Follow cleaning and finishing instructions for Direct Install.CLIQ%u00ae FINISHINGImportant: Before polishing a new assembly, always increase the tension to preserve the seamless appearance of the joints. 1. Start with white diamond Tripolifor first polish with a small brushwheel. Next, hard felt wheelalways polishing from thebottom toward the top of thering. After ultrasonic cleaning,a loose stitched buff is used with rouge. 2. Open the unit, ultrasonic clean, steam clean and oil hinge and latch. Lightly grease the end of the tongue and extension ramps.TENSION ADJUSTMENT WITH PLIERSA. Example of Cliq%u00ae in need of an increase in tensionadjustment. Latch is loose. Notice wide space - or amount of play - at joint. B. Apply pressure to widen arc (as shown) and ease tension. To decrease tension, reverse plier position.A BC D14ky Style 14kw Style Width (mm) Size 4 Size 5 Size 6 Size 7 Size 8 Size 9 Size 10YGSH128 WGSH128 2.7 $766 $804 $842 $880 $1,041 n/a n/aYGSH129 WGSH129 4.0 $1,132 $1,186 $1,243 $1,297 $1,354 $1,406 n/aYGSH130 WGSH130 6.1 n/a $1,777 $1,859 $1,941 $2,027 $2,109 $2,191CLIQ%u00ae INSTALLATIONTEST STRENGTH Cut the bottom of customer's ring andsqueeze sides. If ring bends easily, then a Bridge Installation will be required (see below).MARK FOR CUTTING Place customer's ring and Cliq%u00ae side by side ona mandrel to mark - never cutting closer than 2mmto latch and hinge.CLIQ%u00ae ADJUSTMENTS (CHECK LATCH PINS AND HINGE)If exposed either laser or solder closed. Ring should open and close with ease; firmly and without play in the closed position.TONGUE END ADJUSTMENT (IF NECESSARY)C. In closed position, tongue end should be flush with inside surface. D. Use needle nosed pliers to adjust up or down.DIRECT BRIDGEFINDINGS | CLIQ%u00aeCliq%u00ae Adjustable Shanks are available and stocked in 1/2 sizes, 4.5 through 10.5.Each Cliq%u00ae ring comes with a free Stylus which helps to press the dimple, to open the ring.
